

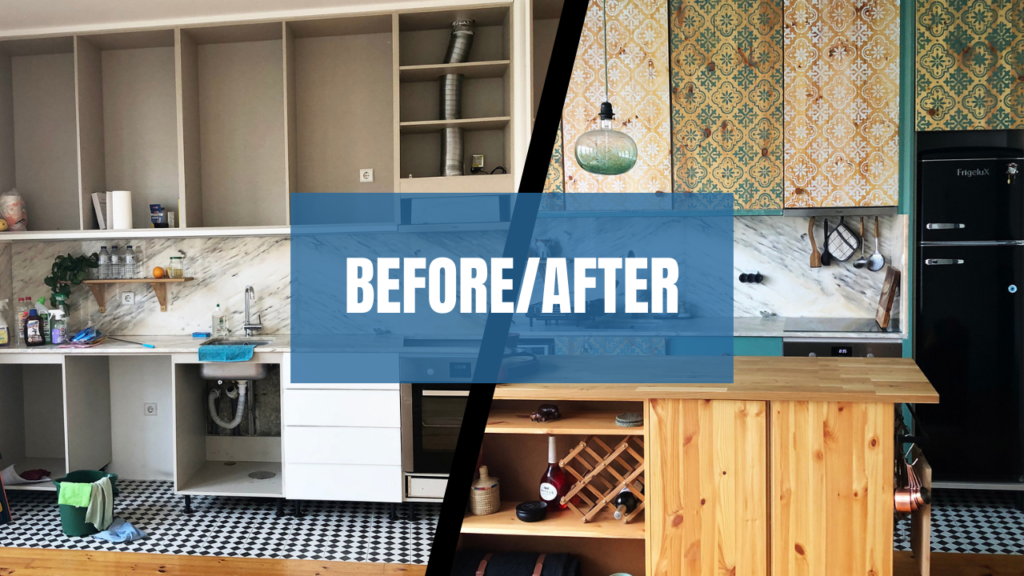
A kitchen transformation
If you saw last week’s blog post, you already know: I bought an apartment. And I’ve spent the spring, summer, and fall making it mine.
Here’s the transformation of my new kitchen.
First up: this is what it looked like after cleaning and before any decorating. A plain white box with excellent floors and excellent lighting:

And an ugly plasticky, beat-up Ikea kitchen.


And, surprise! A super gross problem with mold on the fridge.


Retro fridge
So, my initial plan was to keep the fridge they had in there. Sure it was cheap, but it worked and I was already spending so much money that it wasn’t a priority to replace.
And then there was the mold.
And the hours I spent trying to scrub it all out.
In the end it just didn’t feel clean to me no matter how long I scrubbed.
So I donated my fridge for free to someone who needed it and was willing to scrub. And because of the old Ikea dimensions, I discovered (to my dismay) that none of the energy-efficient fridges would fit in the fridge area of the kitchen.
Rather than demolish a whole kitchen, I had to go energy inefficient. And if I was going inefficient, I might as well go cute.
Enter: the retro fridge and the first design decision I made about this space.


The black and silver gave me my accent colors. Wherever possible, any hardware or light fixtures or things I replaced in the space would need to be black and silver.
That meant the new sink faucet, the towel rack on the island, and the hooks above the stove.
Stove cover
So here’s the other thing the previous owners left me with: an unusable stove top. It was cracked and unsafe to use and before I even moved in, I recruited an acquaintance to help me remove that nasty fire hazard from the space.
Which left me with an empty hole where the stove used to be – and a decision.
Would I replace it or go rogue?

You know the answer.
I actually didn’t have much counter space in this kitchen, and as a person who cooks a lot, I needed more. Building a kitchen island (which I already knew I’d be doing later) would help, but I also liked the idea of turning that old stove top into usable prep space.
So instead of a stove top, I bought a piece of strong, pretty, tempered glass that sat nicely over the hole (I may in future do a pretty wooden cutting board instead, but they get expensive once they are custom sizes, so this works for now!). Now I can use an electric burner (or several) in that space while I’m cooking and I can remove them when I’m not cooking so the space is open for meal prep or appliances that I want to use under the fan (like my electric kettle or Instant Pot),

I also put a little bar behind the cabinet area over the stove top and hung some hooks so that I could have my most commonly used spoons and spatulas at the ready.
Paint
Now, the kitchen, living room, and entryway are all one big space. I knew I wanted to have them complement each other but still feel separate, so I decided to paint each of them their own color and extend that color up into the ceiling to demarcate each space.
The kitchen got the darkest color treatment: a rich green called sage green.
I painted not only the walls and ceiling but also under the cabinets and on any drawer fronts that were not removable/replaceable.


Cabinet doors
You’ll notice from the photos that one of the first things I did was take the old (gross) Ikea cabinet doors off. My plan: to replace them with real wood.
Now buying custom cabinet doors is expensive af. Which is why my plan was to DIY them.
I measured the old doors and had pine wood cut to match those measurements.
Then I sanded them down to get a smooth feel on them and did a coat of tung oil to make the color richer and add a layer of protection.

I bought a tile stencil and then went to work hand-painting the pattern on each door.
I decided to incorporate two colors: the same green as the kitchen and the white with green undertones that I’d chosen for the living room.


Half the doors were white, half green. I alternated the colors.


I also mis-measured one of the doors and had to go trim it down with my little circular saw (just in case you think this process was smooth).
I also had to hire someone to drill the hinge holes on the back of the door because when I tried to do it myself it was a disaster.
That said, I did hang the doors in the end with the help of two different tall people who held the doors while I fastened those last screws into place.
They have a pleasant DIY look to them now – with some of the paint a little uneven and some of the wood a little warped. I really love it.
Oh, and in the end I added knobs for easy opening. Just some pretty circular wooden knobs that I used tung oil on before adding them.
The kitchen island!
In the meantime, I built that kitchen island (see my last post), found a lamp I loved (look at that gorgeous green bulb!), and made sure new things (my dish drying rack, for instance) matched as much as possible.
And there she is, my beauty:

Comments
-
-
Gigi Griffis
Thanks!
-
-
Lee
enjoy your new kitchen
-
Gigi Griffis
Thank you!
-
-
Nan
We have been through six different kitchen renovations in six different houses. I love, love, love what you have done! It’s retro and one of a kind! Bravo!
-
Helena Zenia
I’m so impressed! The island is 👍 perfect!
Sonja Lishchynski
After all this time it’s really nice to see you nesting. 🥰